Stick a bow on it

FCFK - sweet cake
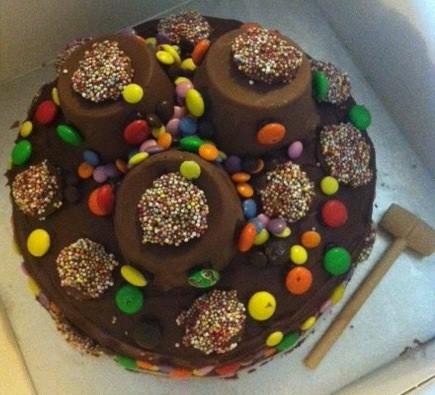
We’re generally of the opinion that more is more when it comes to cake. A thick layer of buttercream? Yes please. Smarties and Maltesers and stars and extra chocolate and a candle? Oh yes! Yes, yes, yes and YES! In fact, this totally amazing cake on the left here, which we’ve affectionately called the Explosion in a Sweet Shop cake, made by our baker Rose last year, is what we reckon kids would conjure up if they were charged with creating a birthday cake. The only way it could be improved would be to douse it in edible glitter. Glitter is always good, especially when a tiny fleck of it somehow gets indefinitely stuck to a serious person’s face and glints in the light every time they move, like the glitter equivalent of *JAZZ HANDS*!

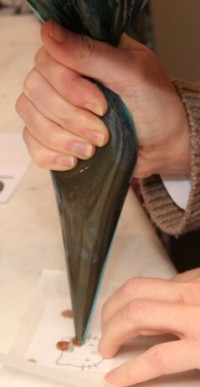
With this more is more approach in mind, you can imagine our excitement when we were taught how to make bows out of flower paste by the incredible SuperJess of Cakes4Fun fame. What can not be improved by the addition of a bow? Hair, clothes, presents, cakes. Stick a bow on them and they’re instantly propelled to another level of awesomeness. Those are the rules. And because we’re generous and want you too to be able to embellish your world with sugar bows we thought we’d bring you a step by step masterclass of how to make them yourself. Cool, hey?

What you need, in an ideal world is a wonderful little invention called “flower paste.”  We used Renshaws but we’re sure there are other brands out there that are just as good.  You can also make bows from sugarpaste or even fondant but they just won’t be as delicate.  Flower paste is like chewing gum in terms of elasticity – you can roll it so thinly that you can read a newspaper through it, yet it still won’t break when you’re moulding with it.  Magic!
Bow making

Here’s what you do:

1. Roll out a long narrow strip of your magical flower paste as thin as you dare.

2. Cut it into four equal lengths if you’d like to create the rather snazzy rosette style bow on the right (or thirds if you want to create a more traditional bow).

3. Take each piece and carefully concertina both the ends, folding them back and forth as many times as you’re able to.

4. Loop each piece in half to form the bow bits of your bow (are we just talking gobbledegoop now?!), and use a little brush and some edible glue to stick the four pieces together as desired.

ca5eb291868b3248e69b71c787ee2113
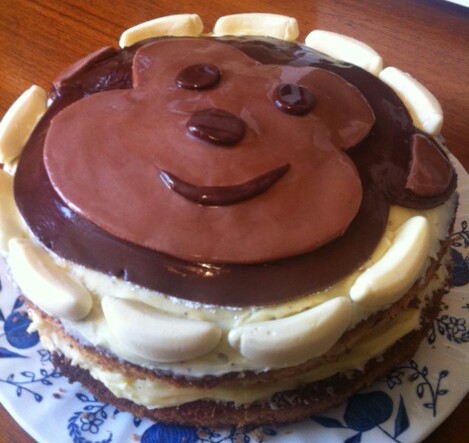
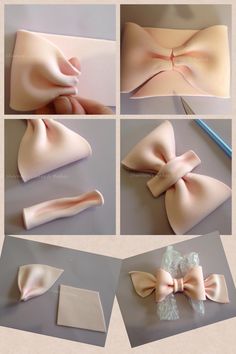
5. Create a little disk or embellishment to cover the joins, or if you’ve gone for a more traditional bow with two loops (as demonstrated in the picture on the left) then use your spare strip of flower paste to loop the two bows together.  This is what we did, by the way – we obviously weren’t deemed up to the task of the four-loop bow!

6. Et voila!  Repeat as many times as you desire.  Go to town.  Go totally crazy and pop a flower paste bow on anything that comes remotely near you.  Someone wants a superhero cake?  Whatever.  We’re pretty sure Batman can pull off a bow.  Quite frankly, with all that tight lycra around we reckon a bow would be the least of his worries.

And of course, as is the way of the world, someone’s explained it better over on the world wide web so go and Google images of flower paste bows, or check out a more professional tutorial on YouTube, but just promise us that ‘more is more’ will be your mantra when it comes to cake.


Cake of the Month – March 2015

Fretful late nights fiddling with icing? Yep, we’ve had a few of those and so has baker Anna, but her reasons for volunteering for us are beautiful. And who doesn’t love a monkey cake? Oo, oo, oo, not us!

IMG_20150420_105821Name: Anna Brewster

Name of cake: Monkey sponge cake

Ingredients:
220g self raising flour
220g sugar
220g butter
4 eggs
2 tsp vanilla essence

Method:
For the sponge:
Cream together the butter and sugar until fluffy. Crack an egg into the mixture, then sift 1/4 of the flour into the bowl and fold it in with a metal knife. Repeat with each egg and the rest of the flour until it’s all combined. This prevents your mixture from splitting.
Bake in a 180 degree oven for about 30 minutes, or until a knife comes out clean.
For the filling:
In a bowl cream 60g butter until maliable, then add icing sugar until it’s your desired consistency and taste (some people prefer more buttery, some more sugary!). Add 1tsp vanilla essence.
When the sponge is cooled, slice it in half lengthways and spread the icing over one half of the sponge, then spread jam over the other half to make the sandwich.
For the decoration:
Half a pack of white royal icing.
Split in half and knead in cocoa powder until desired shades of brown are achieved for the monkey face (one darker; one lighter). Roll out (using plenty of icing sugar so it doesn’t stick to anything) and cut into face and features shapes. Assemble on top of cake. Use warm water and a pastry brush (sparingly) to stick them together, and to clean the top for a shiny finish.
Decorate with foam banana sweets!

About the baker:
I’ve lived in Hackney for years and I work as a volunteer manager for a Hackney-based charity, so I am really passionate about the community of our borough. I’ve been baking for Free Cakes for Kids Hackney for about 2 1/2 years, and I’ve seen it grow and develop so much in that time. Everyone I tell about the charity thinks it’s amazing. I love the idea of turning baking into something altruistic – it’s such a fantastic way of bringing our community together. Personally, I love the challenge of creating something to spec (although it’s meant a few fretful late nights fiddling with icing!) and the thought that a kid somewhere is going to open that box and hopefully light up with a smile on their birthday. What kid doesn’t deserve that?


Cake of the Month – August 2014

When baker Kirsten emailed us a picture of the “tie dye/rainbow” cake she had made and delivered to a Hackney child at the end of last month we were instantly transported back to our ’90s youthhood.  Hello tie dye!  Hello Magic Eye books!  Hello oversized Global Hypercolour t-shirts and cycling shorts and Salt-N-Pepa’s Let’s Talk About Sex on the ghetto blaster.  “Spinderella cut it up one time.”  Sorry, we totally took that too far …

… back to the cake.  We loved it, and we instantly wanted to know how to create a tie dye cake ourselves.  What better opportunity for a masterclass from the baker herself than Cake of the Month?  Little did we know then that it’s also a rainbow cake inside with concentric circles of colour in the actual batter too.  Legendary.
FCFK - tie dye cake

Name of baker: Kirsten Mansfield
Name of cake: tie dye rainbow cake

Ingredients:
For the cake:
350g self-raising flour
350g soft butter
350g caster sugar
6 large free range eggs
1 tablespoon vanilla extract
up to 40ml semi-skimmed milk
6 different gel icing colours (I used red, orange, green, blue, yellow and purple)

For the icing:
100g butter, soft
250g cream cheese, at room temperature
600g icing sugar, sifted


Method:
For the cake:

First, preheat your oven to gas mark 4/170 degrees/360 degrees Fahrenheit and mix up your cake batter in the usual way – cream your butter and sugar until combined, add eggs one at a time followed by a little of the flour and mix well before adding theremaining flour and vanilla extract. If your mix is a little thick, add up to 40ml of semi-skimmed milk – adding a tablespoon at a time and stopping when you get to a consistency that you’re happy with.

Divide the mixture into six bowls, and make each bowl a different rainbow colour. Line the bottom of two 9 inch cake pans with wax paper, and grease the sides. Layer your cake batter in concentric circles. Use about 3/4 of the bowl for your bottom colour, then use a little less of each colour as you continue. Layer your second cake pan in the opposite order.

For the icing:

Melt the butter in a heat proof bowl in the microwave for 20-30 seconds, until close to completely melted. Whisk the butter until no lumps remain. Whisk in your cream cheese, again until no lumps remain.

Prepare your icing sugar, and then sieve it in to the cream cheese mixture 150g at a time, stirring gently with a wooden spoon between each addition. When all the icing sugar is incorporated, pop the frosting into the fridge to chill.

For the tie dye decoration:

Once you have frosted the cake make concentric circles with the gel on the top of your cake, starting with the largest circle (I used red on the outside) and working your way in to the middle (I used purple on the inside as I did not have as much left). Using a small, flat paintbrush, start at the centre circle and brush toward the outside of your cake – you will need to wash your brush a lot to keep it from creating a brown colour.

About the baker:

I was born in South African and my family and I moved to Qatar when I was eight. My mother taught me, my sister and our friends to bake at a young age and we took turns to make muffins and cakes to take to school. Throughout my school education and legal studies I have enjoyed volunteering and I taught swimming to children which encouraged me to get involved in various children’s charities. After university I travelled to Kenya and taught at a school for disadvantaged children in Mombasa which was a fascinating experience as I was able to immerse myself in the community.

When I moved to London two years ago I decided I wanted to carry on with volunteering but I needed it to be flexible as I was looking for a job and I didn’t know what kind of hours I would be doing. I currently work at Goldman Sachs and Free Cakes for Kids Hackney provides a great opportunity for me to combine my passion for baking with my interest in charity work. I was particularly interested in Free Cakes for Kids as it is a brilliant community service which has the opportunity to bring happiness to so many children and families.


Cake of the month – July 2014

Time and time again we are blown away by our bakers’ creativity. This cake is no exception. We bloody love the fact that Kelly didn’t give up on her mission to create an ingenious “smash cake” even though the heat was against her and she could have easily *just* presented us with a sandwich cake.

Making your own chocolate domes? Why not! That’s nothing for a baker who has made a W E D D I N G cake – eek! (We couldn’t resist including a picture of the wedding cake Kelly made too … scroll to the bottom to see it as well as her beautiful reasons for volunteering for us.)

FCFK - smash cake
Name of baker: Kelly Davis

Name of cake: Piñata cake

Ingredients:
A home-made chocolate-orange marble cake; chocolate icing; vegetarian sweets; milk chocolate; chocolate buttons; hundreds & thousands; a toy mallet; and a chocolate mould (see details below).

Method:

I saw piñata cakes on the internet and thought they looked like something a child would enjoy. You get a delicious birthday cake but you also get to smash it up. What’s not to love? I predict that these cakes will become a bit of a craze.

The biggest mistake I made was attempting to make a giant chocolate dome to cover the entire cake – and attempting to make it on the hottest day of the year. Using a balloon as a mould, I tried to make a big dome but it just wouldn’t cool down enough for the chocolate to harden. Putting it in the fridge didn’t help because as soon as I took it out again it started to collapse. I compromised by using large silicone muffin pans as moulds. I covered them in thick layers of melted milk chocolate and froze them solid. It worked! After unmoulding the chocolate I laid the domes over little mounds of sweets and then decorated both the cake and the chocolate domes.

The birthday child then gets to smash the chocolate domes with the little mallet to discover the sweets inside. In the winter I will try a whole-cake dome again. Fingers crossed I’ll have a bit more success!

FCFK - wedding cake
About the baker:

This is my twelfth cake for Free Cakes for Kids Hackney. I do lots of volunteering in Hackney but this is special. I get an opportunity to make cakes and try out new techniques and ideas – and the cake goes to someone who really needs it.

If it weren’t for FCFK Hackney I wouldn’t have got to try my hand at princess cakes, football cakes, Spiderman cakes – and of course this piñata cake. If I could make a cake every week I would!

I feel lots of excitement when the cake turns out alright and it’s ready to be delivered. I like that I get to remain anonymous – like some sort of birthday fairy!


Buttercream to blow your mind

What do Hello Kitty, Spiderman and Peppa Pig have in common?

Apart from the fact that they are all popular requests for FCFK Hackney cakes, the answer is: we can recreate them in buttercream like pros. And we’ll let you into a secret: we most certainly aren’t pros!

So how to we do it? Well, it’s all down to the humble fridge-freezer. All hail the star of the show, the fridge-freezer!

Confused? You soon won’t be. Grab a cup of tea and a slice of cake and settle down for a masterclass. Don’t say we never give you anything!

Introducing…

THE FROZEN BUTTERCREAM TRANSFER
(Full disclosure: we didn’t come up with this ourselves; we are not that awesome and don’t have those skillz. This was taught to us at our Christmas bakers’ social by Super Jess of Cakes 4 Fun fame; she is that awesome and does have those skillz.)

IMG_20140223_223650You will need:
– The image that you would like to adorn your cake with printed/drawn on to a piece of paper. (If it matters which way round the image is, ie. if it includes lettering, then you will need the image in reverse, ie. a mirror image of the true image. Still following?!)
– Some wax paper, or grease proof paper should do the job.
– Some piping bags. Disposable ones are great – you can cut the hole in the end to whatever size you want and a nozzle isn’t necessary.
– Buttercream dyed in as many colours as you want to feature in your image. Note: you don’t want your buttercream too sloppy so go steady if you use milk to loosen it. Also, top tip! If you want black, it’s easier to start with a chocolate buttercream. Yum yum!
– A freezer, and maybe a baking sheet or something stiff and flat and freezer-proof.
– And a cake. Never, ever forget the cake!

What you do:
– Get your printed/drawn image and cover it with your wax paper. If you put a tiny blob of buttercream between the two sheets it can stop them moving around and mucking up your design.
– Fill each of your piping bags with the separate colours of buttercream; twist the ends down; and cut the tips off. Note: you can always cut off more if you need more buttercream to come out, but you can’t stick it back on. Less is more. Didn’t your parents tell you that?!
– Take the piping bag of buttercream colour you’d like to outline your image in. If we’re using the example of Peppa Pig, we’d use a dark pink as the outline.
– Carefully, with as steady hand as possible, trace the outline of your image.
– Build up the rest of your image, using other colours where necessary. Peppa, for example, likes a nice rosy pink cheek, a dark pink smile and black dots in white eyes. Remember that your iced image will eventually be turned out so you need to build it up in layers from the outside in. This would mean doing the black pupil of the eye first and then piping over the top with white.
– Once you’ve created your outlines, you can pipe to fill in the design. Back to Peppa and we’d be using pale pink to fill. To get a nice flat design, or a slightly more 3D image, you can pipe over the entire back of your image.
– Then you just need to pop the wax paper with icing on into your freezer. (This is where a baking sheet might come in handy.) And wait for it to set hard.
– And then? Get it out the freezer; peel the buttercream away from the wax paper; place it carefully on your (iced) cake; and step back and admire your handiwork. You are a pro; queen (or king) of the buttercream; give yourself a pat on the back; you’ve earned your place in the FBCT (frozen buttercream transfer to those not in the know!) crew!

Here’s Hello Kitty (in miniature) step-by-step form (but do bear in mind that the larger the image, the easier it would be, unless you are a Borrower):
IMG_20140223_221547IMG_20140223_214125IMG_20140223_215457IMG_20140223_221041

IMG_20131206_214750And if all that sounds as clear as mud, go and Google videos of frozen buttercream transfer techniques made by someone who actually knows what they’re talking about.

But do trust us on this one!

We may suck at writing instructions, but the icing itself really is relatively easy to do and the results are pretty spectacular, as demonstrated by the Spiderman face on this cake made by one of our bakers for one of our Hackney children shortly after she learnt the technique at our workshop. See! It’s so good that you’ll want to try it out immediately!

FBCT FTW say FCFK Hackney!