Free Cakes For Kids – Hackney

Free Cakes for Kids Hackney is a community service for families who find it difficult to provide a birthday cake for their child. The cakes are baked by volunteers from the local area. Free, friendly and confidential.

At the heart of Free Cakes for Kids Hackney are individual birthday cakes. Put simply, we match families in need with passionate local bakers. We work with local organisations in Hackney that support children and families, who make referrals to our service.

Free Cakes for Kids Hackney is part of the Free Cakes for Kids UK Network. Find out more about the UK Network of Free Cakes for Kids groups here

Contact
hello@freecakesforkidshackney.co.uk


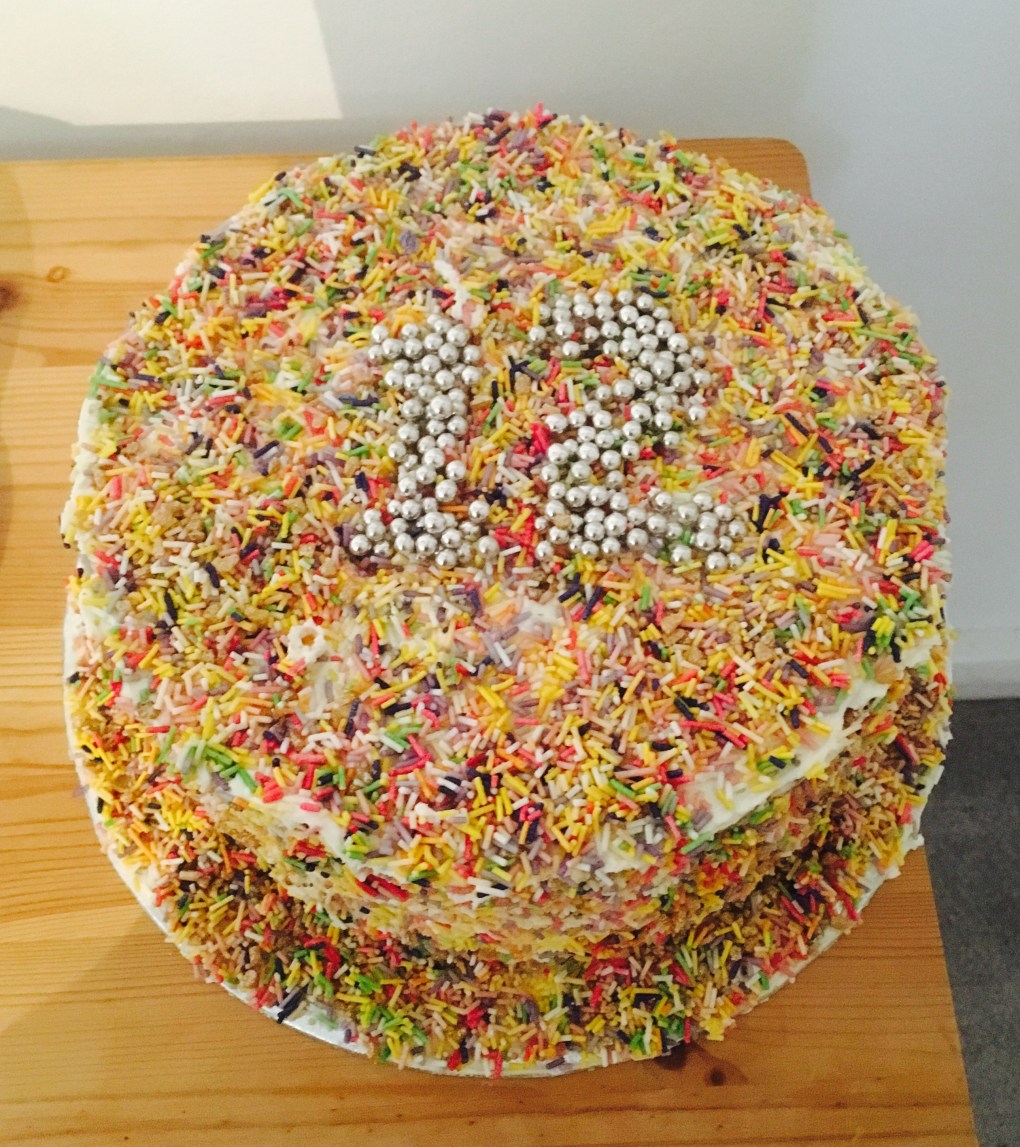
Cake of the Month – May 2017

FullSizeRender

Name of baker: Samantha Harvey

Name of cake: Rainbow cake

Ingredients:
For the cake
285g caster sugar
285g butter
5 eggs
340g SR flour
6 ml vanilla essence

For the filling, icing and decoration
6 TBSP jam of your choice
400g butter
800g icing sugar
1 TBSP just boiled water
Sprinkles of your choice
Silver dragees

Method:
For the cake 
Grease and line 2 8″ round sandwich tins and preheat the oven to 170 degrees C.
Cream the butter and sugar together until very pale and fluffy.
Add the eggs one at a time and beat into the mixture, beat in the vanilla essence.
Fold in the flour using a large metal spoon.
Divide the mixture between the 2 prepared pans.
Bake for approx 30 mins or until golden and cooked through.
Rest for 5 mins before turning out and set aside to cool.

For the decoration
Beat the butter until pale and aerated.
Add in the icing sugar and water and beat until white and fluffy.

To assemble the cake
Spread the jam on one side of one of the cakes and some icing on one side of the other cake and sandwich together.
Coat the entirety of the vertical sides of the cake in the icing.
Tip the sprinkles in to a large tray and roll the cake through the sprinkles.
Stick the cake to a cake board and ice the top layer. Cover with sprinkles and decorate with silver dragees as desired.

A bit about yourself and how you got in to baking/ why you chose to volunteer with Free Cakes for Kids Hackney
Having trained as a chef back in Australia I now manage a central London Cookery school. I have always enjoyed baking and was lucky enough that growing up every year my mum always made my sister and I a homemade birthday cake, which even thinking about now I have such fond memories of. Now that my job is not 100% in a kitchen, I actually really miss it and find that baking allows my creative side to really come out. I started volunteering for FCFK as I was looking to contribute some time to a local charity and after recently moving to the area thought this would be a perfect opportunity. Having such great memories of all my birthday cakes it feels me with great sadness to think that a child’s birthday would go by without a cake.


Cake of the Month – April 2017

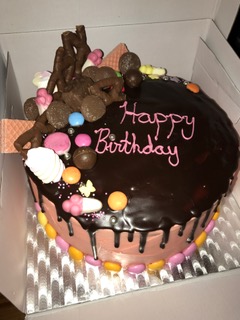
image1

Name of baker: Jenny

Name of cake: Chocolates & sweets galore! 4 layer chocolate sponge sandwiched with pink buttercream and finished with chocolate ganache topped with sweets

Ingredients:  chocolate cake: cater sugar, vegetable oil, eggs, cocoa powder, vinegar, vanilla extract, self-raising flour, bi-card buttermilk. Pink buttercream icing: butter, icing sugar, milk, vanilla extract, pink food colouring. Chocolate drizzle: chocolate, cream, butter. Decorations: pink wafers, curly wurly, fruit mentos, marshmallows and other assorted chocolates & sweets, pink white & silver sprinkles

Method:
Cake- beat sugar, eggs, vinegar, oil & vanilla with electric beaters for 5 mins until lights and airy. Fold in cocoa, flour, bi-carb until just combined. Add buttermilk and stir until all incorporated. Baked at 180c

Icing: buttercream – beat softened butter with electric beaters for a few mins until soft and creamy. Add icing sugar and vanilla extract until continue mixing until light & fluffy. Add a splash of milk if too thick. Add food colouring a few drops.
When cakes are cooked and cooled for a few hours layer cakes with buttercream. Apply a thin layer of buttercream around outside of cake and chill for 1-2 hours. After chilling apply a second layer of buttercream to the outside.
Chocolate ganache drizzle- melt chocolate, cream & butter in microwave on medium until just melted. Pour over cake as soon as ganache reaches room temperature using a teaspoon to get the drip effect down the side
A bit about yourself and how you got in to baking/ why you chose to volunteer with Free Cakes for Kids Hackney:
My mum is a great baker and she started teaching me to bake when I was little. I really enjoy baking and I came across an article in a Sainsbury’s magazine earlier this year about Free Cakes for Kids. After a little search online I found that FCFK was closest to where I live & work. Although I don’t live in Hackney, I signed up straight away.
I try to bake 1 cake each month for FCFK, it’s a few hours for each cake but my baking and icing skills are improving with each cake I do.
Growing up my Mum always made sure my siblings & I had great homemade cakes for our birthdays and I like knowing that each cake I bake goes to a child who may not have gotten one otherwise.

Cake of the Month – February 2017

Smarties surprise cake

Name of baker:  Rebecca Rutt

Name of cake:  Surprise smarties chocolate cake

Ingredients & Methods: You can find all the details on Rebecca’s blog https://bakesfromahackneykitchen.com/2017/02/21/surprise-smarties-chocolate-cake/

A bit about yourself and how you got in to baking/ why you chose to volunteer with Free Cakes for Kids Hackney:
For as long as I can remember I’ve enjoyed baking, whether it’s something I’ve made a hundred times before or an experimental recipe. While at university in Cardiff I first heard about Free Cakes For Kids and then in the past year found out there was a branch in Hackney where I live. I chose to volunteer as I wanted to put my baking skills to good use in the local area. Baking a cake is a small way I can help a child in the community and hopefully give them a brighter Birthday.


Cake of the Month – December 2016

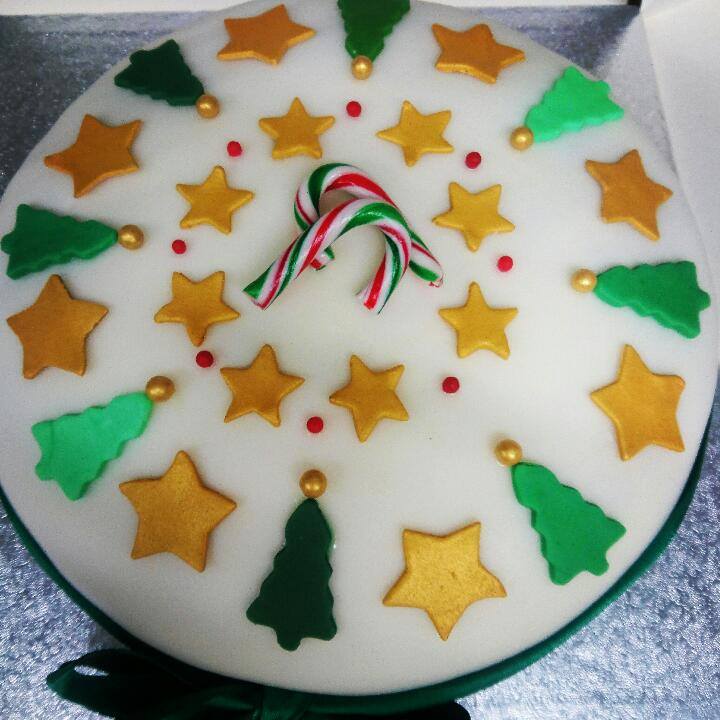
15589947_1388453991174440_2134353387118447622_n

Name of baker: Gail Clark

Name of cake: Christmas Party Cake

Ingredients: 225g softened unsalted butter, 225g golden caster sugar, 4 eggs, 225g self-raising flour, 2 level teaspoons baking powder, 1 teaspoon nice vanilla essence. Strawberry jam for filling, buttercream – 75g softened butter 225g sifted icing sugar and a little milk. Fondant icing

Method: This is a classic Mary Berry Victoria sponge cake. Pre-heat oven 160c Fan, grease two 20cm sandwich tins, line base. Put all cake ingredients into a bowl then mix with electric blender. Bake for 25 minutes – cool then sandwich together with jam and butter icing.

A bit about yourself and how you got in to baking/ why you chose to volunteer with Free Cakes for Kids Hackney:
My Mum was a great baker, and tried to teach me how to bake – and although I watched closely and followed all her tips, my cakes were more like lopsided biscuits! So many years later, when my daughter was coming up to her 7th birthday a friend said why didn’t I have a go at making her a cake rather than buying or begging someone else, usually my brother to make one. It worked – all those tips came back and I had a light fluffy sponge! I’ve never looked back.

My daughter has always had a birthday cake – as has my step-son. I got into Free Cakes for Kids because I wanted to be part of something which helped other children to have a cake. Having a birthday is very special at any age but particularly for a child, it’s a small act but a cake helps to create a memory.

I really enjoyed making a cake for the Christmas party – the perfect excuse to have a good look at Pinterest for inspiration, get the Christmas cutters out and go on the hunt for mini candy canes.


Cake of the Month – September 2016

peppa

Name of baker: Esther Metcalf

Name of cake: Peppa Pig goes swimming

Ingredients: 10 egg Victoria sandwich cake with buttercream and strawberry jam filling (baked in a large deep baking tray)

Method: Standard Victoria sandwich method. Cake cut to shape with section cut out in the center to create the depth of the pool. Then lots of work with fondant to create the tiles, water and Peppa Pig. I used sweets to create the lane markers and rolled fondant to form the letters for the name and happy birthday message. I used white buttercream to make the water splashes around the pig.

A bit about yourself and how you got into baking/ why you chose to volunteer with Free Cakes for Kids Hackney:
I volunteer because every now and then it’s great just to hide away in the kitchen and have fun making colourful, sugary creations.
Because it’s for kids it’s good to be frivolous with the decorations, use of colour and also the execution of the theme. It also helps living up the road from the wonderful Party Party on Ridley road where the first floor is a baking mecca. http://www.ppshop.co.uk/


Cake of the Month – August 2016

August_cake_of_the_month.jpg

Name of baker:  Kelly Davis

Name of cake:  Oreo cake

How did you make the cake:
I have a couple of Oreo cake recipes that I use – depending on whether I can find buttermilk easily or not.  This time, I could so used this one. You can find it here: http://www.lifeloveandsugar.com/2015/02/04/chocolate-oreo-cake/*

Tell us a bit about yourself and how you got in to baking/ why you chose to volunteer with Free Cakes for Kids Hackney:
I have developed a bit of a reputation for baking kooky-looking, bright coloured cakes for friends and family.  I’ve been volunteering for Free Cakes for Kids Hackney for 3 ½ years. It’s a great opportunity to try out all kinds of cake-making skills. I prefer open briefs, where I can make one of the cakes on my long wishlist of cakes I want to try one day.  I still hold out hope I’ll get to make a train cake, bag cake, and a peacock cake some time.

Cake decorating can be stressful and I confess there have been times I wonder why I push myself so hard.  Then I’ll hear a story from one of the charities that receive the cakes, telling me that the birthday cakes really do make a difference to the people who receive them.  To be honest, that is all the motivation I need.

* Some extra tips for recreating Kelly’s Oreo cake
Set oven to 150c. Grease 9” baking tins. I quite like Wilton’s Cake Release.  Some people divide this mixture among 3 tins, some 2, others use one huge tin and cut the resulting cake in two.  To play it safe, use 2 tins.

  • Add all dry ingredients to a large bowl and mix together.
  • Add eggs, buttermilk and vegetable oil to the dry ingredients and mix well.
  • Add vanilla to boiling water and add to the mixture. Mix well.
  • Pour into cake tins and bake until a skewer comes out clean. This could be up to an hour so keep an eye on it.  When my kitchen starts to smell like chocolate cake, I know it’s nearly done.
  • Remove cakes from oven and leave to cool in tins for 10 minutes.
  • Cool completely on cake racks.

Make icing

  • Beat butter and shortening together until smooth.
  • Slowly add 4c of the icing sugar and mix until smooth. Add another 4-5c of icing sugar and mix until smooth. Add a little water to get a smooth consistency if you need it.  At this stage it will be CRAZY hard and stiff, like concrete for laying bricks.  You will be glad of this, trust me.

Decorate

  • Level off the cakes by cutting off tops or any bits you don’t need.
  • Spread a thick layer of icing between the cakes.
  • Ice the top and sides of the cake. The icing is so stiff that if you want to create thick layers of icing and nice sharp edges on the top of the cake, you can.
  • Top with piped rosettes of leftover icing and Oreo quarters.

Oh hi!

Hello there! Thanks for stopping by to check out our truly delectable website 🙂

The more observant amongst you may have noticed that this here blog thingy hasn’t been updated in, like, FOREVER. Ah, yeah… ‘life’ kind of got in the way.

imageMmmm, cake.

Sorry, we got distracted.

Where were we? Oh yes… we’ve been a little too busy *cough* eating cake *cough* holding family baking workshops, running children’s cake decorating stalls, fundraising in all manner of exciting ways, hosting socials for our fab-u-lous bakers, being interviewed and photographed, writing annual reports like proper grown ups, judging cake competitions like Mary and Paul, and, above all else, fulfilling the birthday cake requests that come in from brilliant referrers for brilliant children so that they don’t miss out on having cake and being spoilt on the special days in their lives.

In fact, guess what? This is pretty major news so you may want to hold onto your hat if you’re wearing one. We’ve now baked over FIVE HUNDRED cakes for children who would have otherwise gone without. Now that’s a total we can be proud of. Yay!

image

So if we’re a little quiet on here, you can be pretty darned certain that it isn’t because we’re quiet in real life. Oh no. And we’re always Facebooking and tweeting what we’re up to so come and say hi over on those other corners of the tinterweb. We love it. Especially if you ‘like’ us!

Right then. Better get on with life…

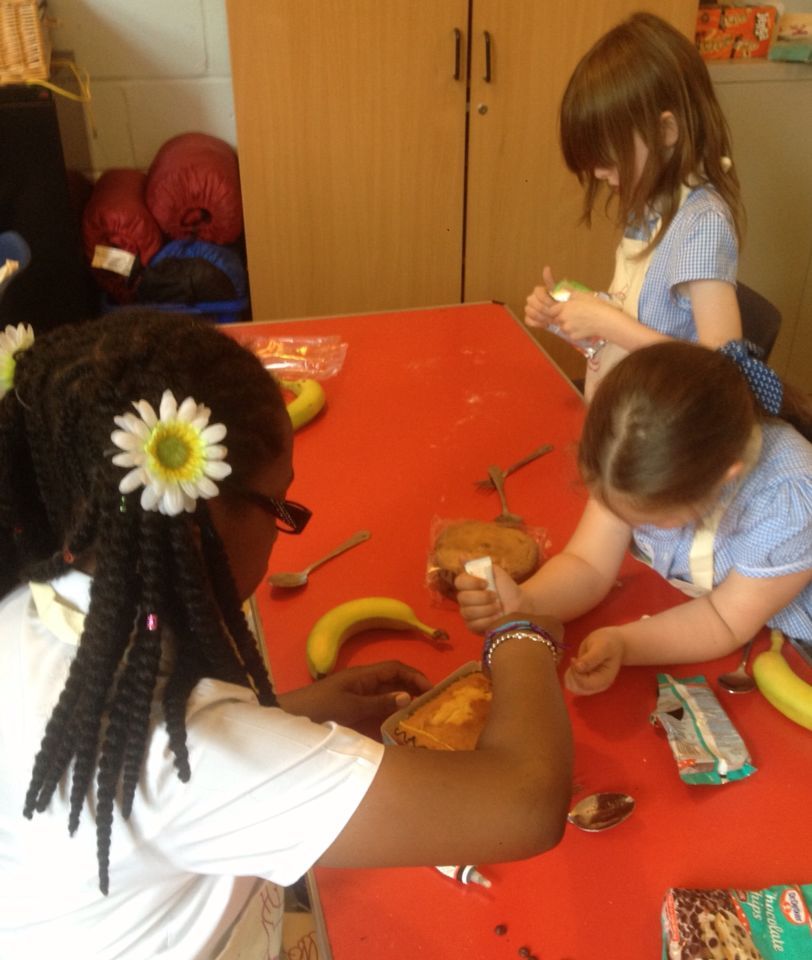
We’ll leave you with some pictures from a fun little baking workshop we recently ran for a group of Hackney young carers in conjunction with Action for Children as part of Carers’ Week. These kids had it all sussed. They smashed the microwave mug cake recipe (no bananas, thanks, and woah, woah, woah, they weren’t touching a sultana!) and stormed their cake decorating challenge. Actually we’re thinking of retiring and leaving them to run this show.

Laters!

imageimageimage


Stick a bow on it

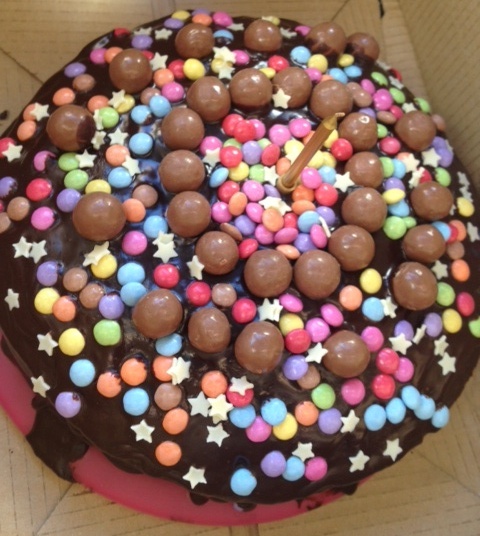
FCFK - sweet cakeWe’re generally of the opinion that more is more when it comes to cake. A thick layer of buttercream? Yes please. Smarties and Maltesers and stars and extra chocolate and a candle? Oh yes! Yes, yes, yes and YES! In fact, this totally amazing cake on the left here, which we’ve affectionately called the Explosion in a Sweet Shop cake, made by our baker Rose last year, is what we reckon kids would conjure up if they were charged with creating a birthday cake. The only way it could be improved would be to douse it in edible glitter. Glitter is always good, especially when a tiny fleck of it somehow gets indefinitely stuck to a serious person’s face and glints in the light every time they move, like the glitter equivalent of *JAZZ HANDS*!

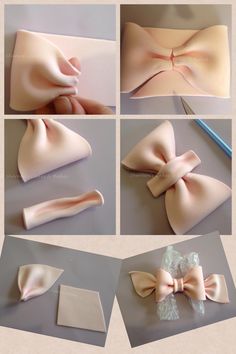
With this more is more approach in mind, you can imagine our excitement when we were taught how to make bows out of flower paste by the incredible SuperJess of Cakes4Fun fame. What can not be improved by the addition of a bow? Hair, clothes, presents, cakes. Stick a bow on them and they’re instantly propelled to another level of awesomeness. Those are the rules. And because we’re generous and want you too to be able to embellish your world with sugar bows we thought we’d bring you a step by step masterclass of how to make them yourself. Cool, hey?

What you need, in an ideal world is a wonderful little invention called “flower paste.”  We used Renshaws but we’re sure there are other brands out there that are just as good.  You can also make bows from sugarpaste or even fondant but they just won’t be as delicate.  Flower paste is like chewing gum in terms of elasticity – you can roll it so thinly that you can read a newspaper through it, yet it still won’t break when you’re moulding with it.  Magic!
Bow making

Here’s what you do:

1. Roll out a long narrow strip of your magical flower paste as thin as you dare.

2. Cut it into four equal lengths if you’d like to create the rather snazzy rosette style bow on the right (or thirds if you want to create a more traditional bow).

3. Take each piece and carefully concertina both the ends, folding them back and forth as many times as you’re able to.

4. Loop each piece in half to form the bow bits of your bow (are we just talking gobbledegoop now?!), and use a little brush and some edible glue to stick the four pieces together as desired.

ca5eb291868b3248e69b71c787ee21135. Create a little disk or embellishment to cover the joins, or if you’ve gone for a more traditional bow with two loops (as demonstrated in the picture on the left) then use your spare strip of flower paste to loop the two bows together.  This is what we did, by the way – we obviously weren’t deemed up to the task of the four-loop bow!

6. Et voila!  Repeat as many times as you desire.  Go to town.  Go totally crazy and pop a flower paste bow on anything that comes remotely near you.  Someone wants a superhero cake?  Whatever.  We’re pretty sure Batman can pull off a bow.  Quite frankly, with all that tight lycra around we reckon a bow would be the least of his worries.

And of course, as is the way of the world, someone’s explained it better over on the world wide web so go and Google images of flower paste bows, or check out a more professional tutorial on YouTube, but just promise us that ‘more is more’ will be your mantra when it comes to cake.
Cake of the Month – March 2015

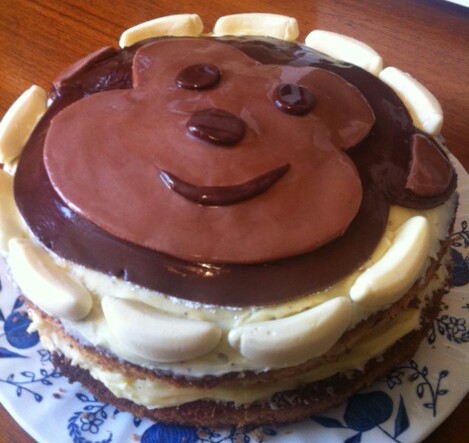
Fretful late nights fiddling with icing? Yep, we’ve had a few of those and so has baker Anna, but her reasons for volunteering for us are beautiful. And who doesn’t love a monkey cake? Oo, oo, oo, not us!

IMG_20150420_105821Name: Anna Brewster

Name of cake: Monkey sponge cake

Ingredients:
220g self raising flour
220g sugar
220g butter
4 eggs
2 tsp vanilla essence

Method:
For the sponge:
Cream together the butter and sugar until fluffy. Crack an egg into the mixture, then sift 1/4 of the flour into the bowl and fold it in with a metal knife. Repeat with each egg and the rest of the flour until it’s all combined. This prevents your mixture from splitting.
Bake in a 180 degree oven for about 30 minutes, or until a knife comes out clean.
For the filling:
In a bowl cream 60g butter until maliable, then add icing sugar until it’s your desired consistency and taste (some people prefer more buttery, some more sugary!). Add 1tsp vanilla essence.
When the sponge is cooled, slice it in half lengthways and spread the icing over one half of the sponge, then spread jam over the other half to make the sandwich.
For the decoration:
Half a pack of white royal icing.
Split in half and knead in cocoa powder until desired shades of brown are achieved for the monkey face (one darker; one lighter). Roll out (using plenty of icing sugar so it doesn’t stick to anything) and cut into face and features shapes. Assemble on top of cake. Use warm water and a pastry brush (sparingly) to stick them together, and to clean the top for a shiny finish.
Decorate with foam banana sweets!

About the baker:
I’ve lived in Hackney for years and I work as a volunteer manager for a Hackney-based charity, so I am really passionate about the community of our borough. I’ve been baking for Free Cakes for Kids Hackney for about 2 1/2 years, and I’ve seen it grow and develop so much in that time. Everyone I tell about the charity thinks it’s amazing. I love the idea of turning baking into something altruistic – it’s such a fantastic way of bringing our community together. Personally, I love the challenge of creating something to spec (although it’s meant a few fretful late nights fiddling with icing!) and the thought that a kid somewhere is going to open that box and hopefully light up with a smile on their birthday. What kid doesn’t deserve that?


Those five hours where we couldn’t feel our toes

photo 1-2Oh what a glorious day it is today – blue sky; sun; a positively balmy 18 degrees.  Yeah.

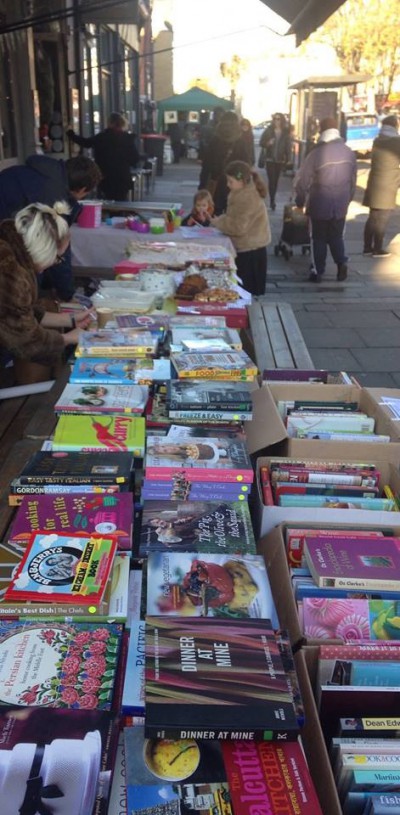
Well cast your mind back to the middle of winter, quite literally, and the picture wasn’t quite so warm.  Were we tucked up under a blanket by a roaring fire?  Oh no.  We decided that we would prefer to spend five freezingly chilly hours under our pals the Empress‘ awning (thanks guys, love ya) touting cook books, cakes and our gorgeous FCFK Hackney wares at the Victoria Park Village Mid Winter Fair.  Let’s just say that we now know why Kat Slater sports fingerless gloves on her market stall when it’s winter on ‘stenders.

Even our ever-so-fetching tights AND socks combo couldn’t save our toes.

Buuut, do you know what?  It was fun.  Vicky Park certainly knows what community is all about and the atmosphere was great.  We sold out of cake, made a serious dint in ‘Cookbook Mountain,’ were nearly wiped out of teatowels and forced some rather chilly grown-ups to hang about getting rather more chilly while their children decorated gingerbread with us to take home and hang on their Christmas trees.  (They couldn’t complain though, we did have hot mulled cider if they wanted it!  Erm, yes please.)

And we raised well over 500 quid which we were pretty chuffed about, as well as generating new referrals and gaining some top new supporters.

Win, win, win.

And after we’d stomped home, even our toes lived to see another day.  Phew.

photo 3-1photo 2-1