Cake of the Month – April 2017

image1

Name of baker: Jenny

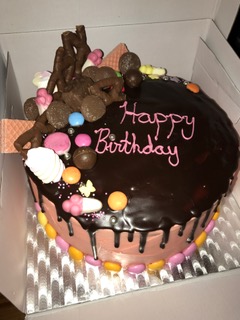
Name of cake: Chocolates & sweets galore! 4 layer chocolate sponge sandwiched with pink buttercream and finished with chocolate ganache topped with sweets

Ingredients:  chocolate cake: cater sugar, vegetable oil, eggs, cocoa powder, vinegar, vanilla extract, self-raising flour, bi-card buttermilk. Pink buttercream icing: butter, icing sugar, milk, vanilla extract, pink food colouring. Chocolate drizzle: chocolate, cream, butter. Decorations: pink wafers, curly wurly, fruit mentos, marshmallows and other assorted chocolates & sweets, pink white & silver sprinkles

Method:
Cake- beat sugar, eggs, vinegar, oil & vanilla with electric beaters for 5 mins until lights and airy. Fold in cocoa, flour, bi-carb until just combined. Add buttermilk and stir until all incorporated. Baked at 180c

Icing: buttercream – beat softened butter with electric beaters for a few mins until soft and creamy. Add icing sugar and vanilla extract until continue mixing until light & fluffy. Add a splash of milk if too thick. Add food colouring a few drops.
When cakes are cooked and cooled for a few hours layer cakes with buttercream. Apply a thin layer of buttercream around outside of cake and chill for 1-2 hours. After chilling apply a second layer of buttercream to the outside.
Chocolate ganache drizzle- melt chocolate, cream & butter in microwave on medium until just melted. Pour over cake as soon as ganache reaches room temperature using a teaspoon to get the drip effect down the side
A bit about yourself and how you got in to baking/ why you chose to volunteer with Free Cakes for Kids Hackney:
My mum is a great baker and she started teaching me to bake when I was little. I really enjoy baking and I came across an article in a Sainsbury’s magazine earlier this year about Free Cakes for Kids. After a little search online I found that FCFK was closest to where I live & work. Although I don’t live in Hackney, I signed up straight away.
I try to bake 1 cake each month for FCFK, it’s a few hours for each cake but my baking and icing skills are improving with each cake I do.
Growing up my Mum always made sure my siblings & I had great homemade cakes for our birthdays and I like knowing that each cake I bake goes to a child who may not have gotten one otherwise.

Cake of the Month – February 2017

Smarties surprise cake

Name of baker:  Rebecca Rutt

Name of cake:  Surprise smarties chocolate cake

Ingredients & Methods: You can find all the details on Rebecca’s blog https://bakesfromahackneykitchen.com/2017/02/21/surprise-smarties-chocolate-cake/

A bit about yourself and how you got in to baking/ why you chose to volunteer with Free Cakes for Kids Hackney:
For as long as I can remember I’ve enjoyed baking, whether it’s something I’ve made a hundred times before or an experimental recipe. While at university in Cardiff I first heard about Free Cakes For Kids and then in the past year found out there was a branch in Hackney where I live. I chose to volunteer as I wanted to put my baking skills to good use in the local area. Baking a cake is a small way I can help a child in the community and hopefully give them a brighter Birthday.


Cake of the Month – December 2016

15589947_1388453991174440_2134353387118447622_n

Name of baker: Gail Clark

Name of cake: Christmas Party Cake

Ingredients: 225g softened unsalted butter, 225g golden caster sugar, 4 eggs, 225g self-raising flour, 2 level teaspoons baking powder, 1 teaspoon nice vanilla essence. Strawberry jam for filling, buttercream – 75g softened butter 225g sifted icing sugar and a little milk. Fondant icing

Method: This is a classic Mary Berry Victoria sponge cake. Pre-heat oven 160c Fan, grease two 20cm sandwich tins, line base. Put all cake ingredients into a bowl then mix with electric blender. Bake for 25 minutes – cool then sandwich together with jam and butter icing.

A bit about yourself and how you got in to baking/ why you chose to volunteer with Free Cakes for Kids Hackney:
My Mum was a great baker, and tried to teach me how to bake – and although I watched closely and followed all her tips, my cakes were more like lopsided biscuits! So many years later, when my daughter was coming up to her 7th birthday a friend said why didn’t I have a go at making her a cake rather than buying or begging someone else, usually my brother to make one. It worked – all those tips came back and I had a light fluffy sponge! I’ve never looked back.

My daughter has always had a birthday cake – as has my step-son. I got into Free Cakes for Kids because I wanted to be part of something which helped other children to have a cake. Having a birthday is very special at any age but particularly for a child, it’s a small act but a cake helps to create a memory.

I really enjoyed making a cake for the Christmas party – the perfect excuse to have a good look at Pinterest for inspiration, get the Christmas cutters out and go on the hunt for mini candy canes.


Cake of the Month – September 2016

peppa

Name of baker: Esther Metcalf

Name of cake: Peppa Pig goes swimming

Ingredients: 10 egg Victoria sandwich cake with buttercream and strawberry jam filling (baked in a large deep baking tray)

Method: Standard Victoria sandwich method. Cake cut to shape with section cut out in the center to create the depth of the pool. Then lots of work with fondant to create the tiles, water and Peppa Pig. I used sweets to create the lane markers and rolled fondant to form the letters for the name and happy birthday message. I used white buttercream to make the water splashes around the pig.

A bit about yourself and how you got into baking/ why you chose to volunteer with Free Cakes for Kids Hackney:
I volunteer because every now and then it’s great just to hide away in the kitchen and have fun making colourful, sugary creations.
Because it’s for kids it’s good to be frivolous with the decorations, use of colour and also the execution of the theme. It also helps living up the road from the wonderful Party Party on Ridley road where the first floor is a baking mecca. http://www.ppshop.co.uk/


Cake of the Month – August 2016

August_cake_of_the_month.jpg

Name of baker:  Kelly Davis

Name of cake:  Oreo cake

How did you make the cake:
I have a couple of Oreo cake recipes that I use – depending on whether I can find buttermilk easily or not.  This time, I could so used this one. You can find it here: http://www.lifeloveandsugar.com/2015/02/04/chocolate-oreo-cake/*

Tell us a bit about yourself and how you got in to baking/ why you chose to volunteer with Free Cakes for Kids Hackney:
I have developed a bit of a reputation for baking kooky-looking, bright coloured cakes for friends and family.  I’ve been volunteering for Free Cakes for Kids Hackney for 3 ½ years. It’s a great opportunity to try out all kinds of cake-making skills. I prefer open briefs, where I can make one of the cakes on my long wishlist of cakes I want to try one day.  I still hold out hope I’ll get to make a train cake, bag cake, and a peacock cake some time.

Cake decorating can be stressful and I confess there have been times I wonder why I push myself so hard.  Then I’ll hear a story from one of the charities that receive the cakes, telling me that the birthday cakes really do make a difference to the people who receive them.  To be honest, that is all the motivation I need.

* Some extra tips for recreating Kelly’s Oreo cake
Set oven to 150c. Grease 9” baking tins. I quite like Wilton’s Cake Release.  Some people divide this mixture among 3 tins, some 2, others use one huge tin and cut the resulting cake in two.  To play it safe, use 2 tins.

  • Add all dry ingredients to a large bowl and mix together.
  • Add eggs, buttermilk and vegetable oil to the dry ingredients and mix well.
  • Add vanilla to boiling water and add to the mixture. Mix well.
  • Pour into cake tins and bake until a skewer comes out clean. This could be up to an hour so keep an eye on it.  When my kitchen starts to smell like chocolate cake, I know it’s nearly done.
  • Remove cakes from oven and leave to cool in tins for 10 minutes.
  • Cool completely on cake racks.

Make icing

  • Beat butter and shortening together until smooth.
  • Slowly add 4c of the icing sugar and mix until smooth. Add another 4-5c of icing sugar and mix until smooth. Add a little water to get a smooth consistency if you need it.  At this stage it will be CRAZY hard and stiff, like concrete for laying bricks.  You will be glad of this, trust me.

Decorate

  • Level off the cakes by cutting off tops or any bits you don’t need.
  • Spread a thick layer of icing between the cakes.
  • Ice the top and sides of the cake. The icing is so stiff that if you want to create thick layers of icing and nice sharp edges on the top of the cake, you can.
  • Top with piped rosettes of leftover icing and Oreo quarters.

Cake of the Month – March 2015

Fretful late nights fiddling with icing? Yep, we’ve had a few of those and so has baker Anna, but her reasons for volunteering for us are beautiful. And who doesn’t love a monkey cake? Oo, oo, oo, not us!

IMG_20150420_105821Name: Anna Brewster

Name of cake: Monkey sponge cake

Ingredients:
220g self raising flour
220g sugar
220g butter
4 eggs
2 tsp vanilla essence

Method:
For the sponge:
Cream together the butter and sugar until fluffy. Crack an egg into the mixture, then sift 1/4 of the flour into the bowl and fold it in with a metal knife. Repeat with each egg and the rest of the flour until it’s all combined. This prevents your mixture from splitting.
Bake in a 180 degree oven for about 30 minutes, or until a knife comes out clean.
For the filling:
In a bowl cream 60g butter until maliable, then add icing sugar until it’s your desired consistency and taste (some people prefer more buttery, some more sugary!). Add 1tsp vanilla essence.
When the sponge is cooled, slice it in half lengthways and spread the icing over one half of the sponge, then spread jam over the other half to make the sandwich.
For the decoration:
Half a pack of white royal icing.
Split in half and knead in cocoa powder until desired shades of brown are achieved for the monkey face (one darker; one lighter). Roll out (using plenty of icing sugar so it doesn’t stick to anything) and cut into face and features shapes. Assemble on top of cake. Use warm water and a pastry brush (sparingly) to stick them together, and to clean the top for a shiny finish.
Decorate with foam banana sweets!

About the baker:
I’ve lived in Hackney for years and I work as a volunteer manager for a Hackney-based charity, so I am really passionate about the community of our borough. I’ve been baking for Free Cakes for Kids Hackney for about 2 1/2 years, and I’ve seen it grow and develop so much in that time. Everyone I tell about the charity thinks it’s amazing. I love the idea of turning baking into something altruistic – it’s such a fantastic way of bringing our community together. Personally, I love the challenge of creating something to spec (although it’s meant a few fretful late nights fiddling with icing!) and the thought that a kid somewhere is going to open that box and hopefully light up with a smile on their birthday. What kid doesn’t deserve that?


Cake of the Month – February 2015

When we told baker Lisa that we’d picked her leopard print cake to be our Cake of the Month for February she said it was, and we quote, “the highlight of her year”! It is only March, but we’ll take that!

PS: We reckon the world would be a better place with a bit more leopard print in it.

FCFK - leopard print cakeName of baker: Lisa Stewart
Name of cake: Luscious leopard print cake

Ingredients:
Easy chocolate cake recipe from BBC Good Food
Butter icing
Jam
Ready to roll icing
Gel food colouring

Method:
I started by making two large chocolate bases, then flattened them off and stacked with some butter icing and jam in between. I then added a layer of butter icing around the cakes before covering with the ready to roll icing.

To get the animal print effect I used a deep purple and black gel colouring, adding uneven blotches of the deep purple all over the cake and then drawing black outlines around these. There are loads of amazing tutorials on YouTube if you want to try it yourself!

To complete the cake, I made a little bow and some numbers out of ready to roll icing.

About the baker:
I recently got quite in to baking after I started making cakes for friends’ birthdays. One of my friends then sent me a link to Free Cakes for Kids and I thought it was such a great idea – I’d get to perfect my cake decorating skills whilst doing something for people in my local community.

Not only is it great fun throwing glitter and sparkles on a cake but it’s also a lovely feeling knowing that your cake could help to make someone’s day special. Everyone deserves to be made a fuss of on their birthday and I like to think my cakes help with that!


Cake of the Month – January 2015

Finally, we’re nearly catching up with our Cake of the Months – we’re into 2015 now at least! This cake was new baker Sophie’s first bake for us. We decided that we’d let her stay 😉

If you’ve ever wondered how to make one of *those* Barbie cakes then wonder no more…

FCFK - little Barbie cakeName of baker: Sophie Simpson
Name of cake: Princess Barbie

Ingredients:
Vanilla sponge cake, buttercream icing, raspberry jam.

Method:
Wrap Barbie in clingfilm (including her hair) in order to protect her from the icing. Stack 3/4 sponges with buttercream and jam until the height reaches Barbie’s torso. Cut a circular hole in the centre for Barbie and shave the top and sides into a bell shape.

Decorate as desired by piping/spreading buttercream dyed pink with food colouring around the cake and finishing with ribbons/edible decorations.

About the baker:
With a busy job, I rarely get a chance to cook dinner, let alone bake, but it’s something I really enjoy therefore I thought FCFK Hackney would provide a great opportunity to do some baking as well as contributing to a wonderful cause.


Cake of the Month – December 2014

Talking of ever so cute cakes … awww, this snowman is just the most adorable thing. And the best thing about volunteering for us for baker Anna? She gets to lick the bowl! Yum yum!

FCFK - cheeky snowman cakeName of baker: Anna Greenwood
Name of cake: Snowman

Ingredients:
For the cake-
Five eggs; then same weight as eggs of self-raising flour, sugar and butter. One or two teaspoons of vanilla extract.
For the buttercream–
250g butter, 500g icing sugar, one teaspoon of vanilla extract
Decorations–
Coloured fondant icing, sweets, carrots, whatever works…

Method:
Heat oven to 180 / 160 if fan. Cream butter and sugar until light and fluffy. Add eggs one by one, mixing thoroughly as each is added. Add vanilla extract. Sieve and fold flour into the mixture carefully without knocking the air out or over mixing. Divide between two tins and bake for 30 minutes until springy, but keep an eye on them after 25 minutes. Allow to cool and make buttercream by mixing the ingredients together.

When cake is cool, cut one cake into a smaller round for the head (unless you’ve baked in two different sized tins), then cut an inch of cake off each round so one can sit on the other. Lather it in buttercream, inside and out if you like. Smooth the outside with a scraper and get it as neat as you can. Give your snowman a face with sweets, liquorice or coloured icing for eyes, nose and mouth. Make a scarf by rolling out two strips of coloured icing, cutting into one end for the authentic frayed scarf look. Make a hat or anything else you fancy. Doesn’t he look nice? Now EAT HIM.

About the baker:
I’m a DJ and work from home so it’s easy for me to whip up a cake during the day. Plus I get to lick the bowl after and everyone knows cake mix is the best bit of this whole baking process. FCFK Hackney is such a great charity and idea and it’s so nice to be part of it and make something fun to be enjoyed at a celebration. My decorating may not be Great British Bake Off worthy, but the cakes always taste good!


Cake of the Month – November 2014

November’s Cake of the Month is up next – a dinosaur in cake form that was so cute it made us fall a little bit in love with it.  If we could have taken it home to keep as a pet then we would have!

FCFK - dragon cake 1Name of baker: Esther Metcalf
Name of cake: Dinosaur cake

Ingredients:
Cake:
Butter, sugar, self-raising flour, baking powder, cocoa powder
Icing 1 (main cake):
Butter, icing sugar, cocoa powder
Icing 2 (under the dinosaur cake):
Butter, icing sugar, vanilla seeds

FCFK - dinosaur making ofMethod:
Standard Victoria sandwich cake method for the cake – I made three circular cakes. Two were used sandwiched together for the base cake which was then covered in dark green fondant and the third cake was used to form the body of the dinosaur.

I made some off cuts for the tail and head and then sandwiched together the remaining halves of the circle to form his arching body.

A base layer of vanilla butter cream made a smooth base to cover over with orange fondant (from my favourite shop, Party Party in Dalston) for the dinosaur’s body, and I added cut out triangles fixed with dabs of water for his spikes and yellow dots stuck on this way too. The best bit was adding his googly eyes and teeth!

A sneaky flourish of green buttercream icing helped cover some cracks in the green fondant.

About the baker:
My day job as an architect doesn’t always mean I get to be as creative as I would like, drawing on the computer all day. So baking is a way for almost instant creative gratification. FCFK Hackney seemed an obvious match. I love making cakes, especially fun ones for kids and FCFK Hackney need volunteers to make them.